Showing posts with label Car Maintenance. Show all posts

Saturday

Dead Vehicle Battery – Recharge To Make Car Run

Recharging a car battery is not quite the same as leaving your cell phone on charge overnight while you sleep. We are dealing with bigger levels of power here, and as a result you need to pay a bit more attention. Your best bet is to have ready a 5 amp car battery charger – any more powerful than this is best left to a qualified mechanic. Using this, it will take about eight hours to charge your battery back up – so if you have somewhere you need to be and no alternative means of conveyance, you will need to fork out for someone to tow the car to a place where it can be charged quickly and fully.

jump-startbattery

Making sure that everything in the engine is clean will help you a great deal when you are trying to make a car run. Under the bonnet of a car there is a lot going on – a cleaner engine will allow it to operate more like it should. The same goes for the battery. Check the terminals. Sometimes these have a build-up of white powder which adversely affects the transfer of power from the battery to the starter. The best way to clean this is to use a wet rag and baking soda. Depending on the reasons for your lack of battery power, the best way of fixing it will vary quite considerably. If current is leaking from the battery it could be for a number of reasons.

Something as simple as leaving a door unclosed when you come in from the car can cause the battery to be running without gaining the extra charge from the car itself. Remedying this problem is quite simple. If it keeps draining even when you are observing good housekeeping procedures, then the chances are that the battery itself is worn out. Recharging in this case can only be a temporary measure and eventually you will need to buy a new one. Keeping a constant eye on how a battery is performing will alert you to where the problem is and whether it needs replacing. In cases where you cannot identify the problem yourself, the best bet is to take it to a mechanic.

Tuesday

Air Filters – Tuned Up Car Performance

Air filters, as far as automobiles are concerned, are used to prevents contaminants and particulates from entering the engine. Lack of an air filter or a bad one could cause in premature wear and tear as well as oil contamination, lowering engine performance and fuel efficiency greatly. Since the quality of air is important in internal combustion engines, air filters are vital in keeping the performance of any automotive vehicle.

Prior to the 1960s, oil bath filters were the industry standard for air filter application. It consist of a round bowl filled with oil and a round insert containing fiber, foam and other coarse materials. The idea is to make air flow go through a maze with large particles being unable to reach the engine due to the loss of momentum and fall into the oil, and smaller particles to get caught by the materials contained inside the round insert. While the setup actually works, maintenance is often messy and inconvenient, which led to the phasing out of the application, save for off road vehicles and engines. Other problems faced by oil bath filters is the increase in exhaust emissions, as well as the relative size needed for the device to be actually effective.
airfilter1234
With the advent of fuel-injected engines, most cars use pleated paper filters shaped as a flat panel. Cars that still use carburetors or throttle body fuel injection configurations use a cylinder-shaped air filter, placed on top of the carburetor or throttle body and covered in either plastic or metal to regulate air temperature.

Pleated paper filters, are usually the stock air filter for most cars and eventually replaced oil bath setups. Of course, the misconception is that the paper in this case isn’t actually the same as the writing medium or material for books used. While cost-effective, efficient and easy to service, pleated paper filters will eventually need replacement, as air flow will be restricted once it gets excessively dirty.

Given the limitations of paper air filters, certain companies and tuner enthusiasts have looked to a more potent material or application in air filtration and cleaning. The aftermarket scene has many brands and companies that provide adequate alternatives, but also upgrades to stock filters. Some brands like True Flow air filters specialize in producing performance air filters and other True Flow performance parts, like their air intake systems, which are usually connected to air filtration.

Car Care Tips - Maintenance Routine

Proper car care can save you thousands of dollars a year. If you stick to the right maintenance routine and quick do-it-yourself check ups, you can prevent breakdowns and make your car last longer – or even resell it at a good amount when the time comes.
The key to prolonging the useful life of your car is prevention – plug the leaks and replace parts that need to be replaced even before they break down. Identifying and quickly fixing a problem while it is small keeps it from being overwhelming and saves you a lot of money in the long run.
Change your oil every three months (or every 3,000 miles). This is the general rule unless you car manufacturer says otherwise. Do not neglect this seemingly trivial maintenance task. Keep in mind that failure to change your oil will increase the wear and tear on your engine, leading to other problems.

Regularly check your transmission fluid, your brake fluid, your power steering fluid, and your coolant. These fluids make up the lifeblood of your car, and checking them frequently can help nip small problems in the bud, saving you from breakdowns and expensive repairs. Different cars require different kinds and amounts of fluid. Read your manufacturer’s handbook to find out more.
Keep your batteries new. Your battery is your most important power source – if it fails you, you will get stranded. This is why it is important to always check it with every oil change. Keep your battery clean with a mixture of baking soda and water. Make sure that the cables are corrosion-free and are securely attached. Remember that most disposable batteries last for only over a year – after that span of time, you should replace your battery.
A car is like a patient – it needs a good doctor. If you are not very handy with cars, have one official mechanic service your car regularly. The mechanic will be able to develop a familiarity with your car and be able to recommend the correct preventive and diagnostic care it needs. What’s more, you can probably get a lot of discounts from mechanics if you are a repeat customer!

Thursday

Tips To Check Transmission Fluid

Of all of the necessary components needed to run a car, the transmission is by far one of the most important. It is where all of the gear shifting is done and this type of thing can be incredibly expensive to repair in the event that it becomes damaged. Transmission fluid needs to be checked regularly much the same way that oil needs to be. It is something that you don't want to forget about if you want to keep your car in the best running condition possible. Checking the transmission fluid is a vital part of car maintenance .Transmission fluid should be checked around every 25,000 miles or so. The fluid and the filter must be changed regularly so that they do not become dirty.

To neglect this could lead to contaminants building up in the fluid and that is not going to be good. You should never mess around when it comes to your transmission.Always pay attention to your car as you drive. When you get to know how it sounds when operating smoothly, you will know when something is wrong. If you know your car then a new or strange sound or feeling will not be missed by you. Pay attention so that you can assess any situations as they arise.If you feel that it is necessary or you have a mechanic recommend it, you can always have your transmission fluid flushed out.

This will help force out any dirt or grime that may be inside the fluid. Some mechanics recommend against a transmission flush so look into this before you make your choice so you can base it on information.It's not a good idea to let your vehicle sit for long periods of time. If it goes without proper service for too long there is a higher chance that you could have metal shavings or other problem items make their way inside. A transmission that is bogged down with metal and junk will need tremendous amounts of care to be in good running shape again.When you check your transmission fluid, always have your vehicle parked on level ground so that you get the right fluid amount. An angle could throw that off a lot and it is not something that you can guess at.

Leave the car idling as you check the fluid. This is one of those maintenance checks that require that the car be left on rather than turned off.Pull out the transmission dipstick and check what the reading says. If it doesn't quite reach the full line then it is low and needs to be topped up. Adding more transmission fluid is not really all that difficult but you must be careful not to add too much. If you do not feel comfortable doing this yourself, you can take it to your local mechanic to have it done. Before you add transmission fluid to your vehicle, make sure that it is the best possible one for your vehicle. Not every transmission is the same.

Saturday

Tips on Tune Up Your Car

Many drivers are not informed about the necessary and preventative care that should come with vehicle ownership. Did you know that a regular tune up helps to prevent the vehicle from rusting, increase gas mileage and keep your family safe? Regardless of how busy your life gets, it is crucial that we maintain good technique when taking care of our vehicles. For this reason, it is crucial that we develop good habits like regular oil changes and regular tune-ups for our vehicles.
How often should you get a tune up? Most vehicle experts recommend that a tune up be completed at least once a year. Of course, other times when the vehicle is given attention can shed light on problems, such as, when the vehicle is in for an oil change every 5,000 kilometers but a tune-up gives the vehicle mechanic a chance to examine the engine, the overall working of the vehicle, and, flush any fluids that are required to make the vehicle ride smooth and like new.
What exactly does a tune up cover when you take your vehicle into the shop? What does the mechanic look for? When you take your vehicle into the mechanic, he or she will have a look at the following aspects:
1. Fluids. When you take your vehicle into the mechanic for a tune up it is a chance to flush any fluids from the vehicle that are old and require changing. Did you know that old fluids become harmful to your vehicle and can cause the vehicle to run poorly? Many fluids in the vehicle run through the entire engine, isn’t it time that we made sure that these fluids were safe? Changing these fluids will mean that the engine will run at full capacity, increasing fuel mileage and reducing emissions.
2. Battery. The mechanic will test the battery within the vehicle to ensure that it is running, and charging properly. Many vehicle experts take the time to examine the outside of the battery and clean the terminals in which the battery attaches to the vehicle. Cleaning and checking the battery can assist in creating a longer lifetime. If a new battery is required, this can be determined with proper testing. Most batteries are relatively cheap and can be easily changed at home, without the use of a mechanic. Having a battery that no longer holds its charge could mean becoming stranded on that cold winter day.


3. Wheels are an important part of the vehicle. Did you know that tires are an essential part of vehicle safety and the running of the vehicle? Tires range in price from low to high, depending on the type chosen for the vehicle.
4. Brakes are examined during routine vehicle tune-ups, as this component stops the vehicle from moving it is essential that they are in working order. Replacing parts of or the entire system is completed on an annual basis to ensure that the brakes are in good working order.
Now you are aware of all of the components which are checked when bringing the vehicle in for a tune up. Often, a report will be given about the state of the vehicle and what has been checked. Follow up on any concerns with the mechanic and ensure that a good check up of the vehicle has been completed.

Friday

Free Car A/C Systems Guides - Refrigerant Is Improved

Any mechanic knows, ability to present comprehensive service to the customers, being capable to offer repairs & care for all the aspects of motorcar maintenance program is a key to retain customers. The AC is standard across all the models nowadays, and while in past, air conditioning maintenance was highly skilled & niche marketplace, it is now essential side of business & key to any of the workshop's sustained success.
To make sure that the refrigerant is improved properly from car's AC system at time of servicing, workshop should use automotive air conditioning machine. These particular devices prevent free through venting of the CFC gases. As EPA guidelines need that when car is getting serviced, Freon, and CFC12, which is been used as coolant must be collected & recycled sequentially that it is not been released in environment where it will potentially damage ozone layer.


Refrigerant used in the most motorcar AC systems is generally based on the chlorofluorocarbons, that is linked with causing the damage to ozone layer, and control of these materials is of concern to environmental agency. Whenever car AC system experiences maintenance, correct care should be taken in order to protect environment from release of the CFCs, & this is done best by using the automotive air conditioning Machines.
Reusing Freon gas instead of allowing it to get vent in atmosphere protects environment. But, when refrigerant is gathered from car's AC it is contaminated with oil, water, and other liquids, which are used in the cars. Using automotive air conditioning machines, it is likely to process refrigerant & remove other fluids from that, allowing it to get reused, in a same system like it has got drained from, or in some other car altogether.
The automotive air conditioning dynamo electric machine is able to provide enough rotational production for starting the engine by running rotor at very high speed in motor operation form for starting engine, as a result obviating need for increasing the size thereof. In motor operation form, electromagnetic clutch fan connects to the electromagnetic clutch major body and as well engages cylindrical member in order to break cylindrical member. The internal gear portion gives fixed element, & torque of rotor is been transmitted to power transmission tool via rotor shaft, sun gear, planetary gear, and carrier.
Alternators are been used in the modern autos to charge battery as well as to power car's electric system when the engine is running. The alternators have great benefit on direct current generators of not making use of commutator that makes it simpler, less costly, as well as more rugged than DC generator.
If presenting AC repairs & servicing is main key to business, then having right tools for job is necessary. Getting it correct at beginning while you choose the AC coolant revival machine often means selecting model from Cool Tech range. All of these robust & very regarded specialist apparatus are at center of any severe AC shop, & thanks to their competence and good value for money, can pay for himself or herself again and again.

Free Winter Car Care Checks List

The onset of autumn is the time when you need to start thinking about winter car care checks. Your car tyres, lights, antifreeze, as well as several other key components, all need to be checked. By doing this will it help minimise or even avoid situations where you have to cope with problems such as cold mornings or icy roads.
1) The condition of your car tyres is particularly important. They are the only contact that your car has with the road. Your car tyres will have to work extra hard when the road is wet or icy, to give maximum traction and control.
Car tyres should have a good tread and as little wear as possible. Think about changing to winter car tyres when conditions demand it.
The alignment of your wheels is another thing you should consider as part of your winter car care checks. Wheels that are out of alignment will create unnecessary wear on your car tyres, which will cause extra steering problems when driving on wet or icy roads.
2) You should regularly check the engine coolant level. Add the correct mixture of anti-freeze before you need it to protect your engine from possible frost damage. Add the proper proportions of anti-freeze to the windscreen washer as well. This allows you to wash your screen even when temperature falls below freezing.
Check the engine oil levels on a weekly basis using the dipstick. It is important to maintain the oil level between the minimum and maximum marks indicated. The best time to check the oil level is when the engine is cold.

3) The pressures of your car tyres are important. Maintaining the recommended pressure improves a car tyre's performance in difficult driving conditions.
Remember to check the spare tyre's pressure and tread depth. Make sure that it is a similar condition to the other tyres or is adequate to use for a short period of time, until the damaged tyre can be repaired or replaced.
4) Your car lights are important, especially in winter when there is reduced daylight and much of your driving will require the lights to be used. Check that all bulbs are working properly. It is best to carry spares, as well as the tools to replace them. Have the alignment of your lights checked at a garage to give yourself the maximum vision possible, and to prevent blinding other drivers.
5) Check the condition of your windscreen wipers. Make sure they clean the screen adequately to allow a clear view of the road. If in doubt then replace them; it is not expensive to do.
If you are not comfortable doing the checks yourself, a local car garage will be able help. They will inspect the car to make sure everything is in good working order, ready to endure the adverse weather condition and the darker nights that the winter season brings.
As an extra precaution there are some items that are useful to carry in your boot at all times. A reflective jacket, shovel, tow rope, jump leads, water and extra screen wash will help in most situations. And a warm coat, gloves, boots and some biscuits will certainly be appreciated if your car breaks down in an isolated location.

Saturday

Free Car Top 10 Checklist - Avoid Breakdown

Every year the motorist is faced with the ordeal of the MOT test, unless their car is less than three years old. The purpose of an MOT is to ensure the vehicle complies with road safety and environmental standards. Without it car owners are unable to obtain a tax disc for driving on public roads.
But what does the MOT tester look out for? Is it car tyres or fuel emissions? It can become expensive when the vehicle fails and needs to be re-tested. To help achieve a first time pass, this 10 point checklist highlights the main components that are included in an MOT test:

1. Brakes
The car's brakes are tested on a 'roller brake tester' to assess their condition, performance and efficiency. Brakes that 'lock up' when applied will fail. Other areas to watch out for are loose brake pedals and signs of leaking brake fluid.
2. Doors and Mirrors
Ensure the doors open and close correctly, from the inside and the outside of the vehicle. Car locks need to work adequately. Wing and rear view mirrors must be present and in good condition. A cracked wing mirror will result in a fail.
3. Exhaust System and Emissions
The car will need to pass specific exhaust emission requirements, depending on its age and fuel type. The exhaust system must not have holes or leaks, often caused by rust.
4. Car Bodywork
Excessive rust corrosion, damage or sharp edges on the car's bodywork will result in a fail.
5. Wheels and Car Tyres
The tread depth on a car tyre must be a minimum of 1.6mm. The car tyre needs to be the correct type for the vehicle and have no signs of excessive wear or damage. It is recommended to consult a car tyres specialist to check this. Ensure all the wheel nuts are present as any missing will result in a fail. Spare tyres are not tested.
6. Windscreen, Wipers and Washer
The wiper blades need to be in good condition and the windscreen washer must contain fluid. The windscreen cannot have any large cracks and must have clear visibility.
7. Lights and Indicators
All lights and indicators need to work correctly, including the hazard lights. Check that the headlamps dip to the correct angle and are not loose.
8. Seats and seatbelts
Ensure all seats are secure in the upright position. It is compulsory for seatbelts to be fitted in the front and back of a car. They must be the correct type and in good, working condition.
9. Steering, suspension and horn
All three need to be in good condition and work correctly. Make sure the horn is the right type for the vehicle. Ensure the wheels are correctly aligned and the car tyre pressures are correct, as these can affect the vehicle's steering.
10. Registration Plate and Vehicle Identification Number
The registration plate needs to be in the correct format, legible and in good condition. Every car used after the 1st August 1980 must have its vehicle identification number clearly displayed.
Lights, brakes, suspension and car tyres are the four most common reasons why a car will fail its MOT. This checklist is intended as a guide to improve your cars chance of passing. If in any doubt we recommend consulting your local garage before taking the MOT test.

Free Tips on How to Replace Brake Pads

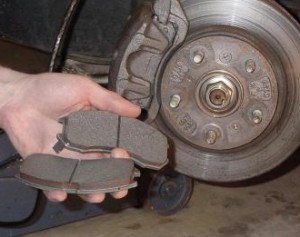
Brake pads naturally wear out over time. Luckily, it is not as difficult to replace them as you may think. The tools that you need for this project include a lug wrench, c-clamp, adjustable or open wrench, Allen wrenches, hammer, and a bungee cord. When you jack up your car, make sure that you have it supported by blocks or jack stands. It is never safe to work on a car that is supported by a jack only. The first thing you need to do is remove the wheel. The lugs should be easy to take out, it is best to do so from the bottom up.

Next, in order to remove the brake pads you must first remove the brake caliper. The brake caliper can be located just above the lug bolts, sitting on top of the brake disc. There is a bolt that keeps the caliper in place. You can remove it easily using the suitable wrench. There are different types of bolts that could be keeping it in place, so it is a good idea to have different wrenches handy. Now you can pull the caliper off by pulling directly up. You may need to wiggle it a bit in order to loosen it. Now you can sit the caliper some place convenient, or use your bungee cord to tie it up.
Now comes the time to remove the brake pads. They should actually slide right out without giving you any trouble. Remember how they are attached though, because you will need to know this when you are installing the fresh ones. If you are driving an older vehicle, you may need to tap them with your hammer a bit to get them unstuck. There may be some small metal tabs keeping the pads in place as well. If so, make sure you hang onto them; you will need them when you put the new pads in.
Now you can easily slide your new brake pads in, using the metal tabs to keep them in place if applicable. Now with your new pads affixed, you should adjust the brake piston. This piece of equipment adjusts as your pads wear out in order to keep your brakes working efficiently. To readjust it, you need your c-clamp. Put the end of the clamp with the screw against the piston. The other end should rest behind the caliper assembly. Now just slowly tighten the clamp until the piston has moved to a point where you can insert the pads easily.
The next thing you need to do is slide the caliper assembly over your new pads. Replace the bolts. At this point, it is a good idea to push down the brake petal a few times so that you may be assured of your brake pressure. Now you can replace the wheel and the lug nuts. It is a good idea to make sure that the lug nuts are truly secure. At this point you have successfully changed the brake pads on your car.

Tuesday

Free Guides on Keeping The Brakes Reliable

Being on a freeway can be tough. You have to act as though you're in one of those fast car movies that don't seem to notice that there is a steep cliff ahead. It has become a race. The first one to pass it goes home early. But what if you are hurrying and doing a hundred on the freeway when suddenly, you notice a very important part of your driving aspect is missing. You freak out knowing that your breaks aren't working. Worst part is, you see traffic up ahead. Is this it for you?This is something you don't want to experience.


If you ask anyone that owns a car, the most important thing to do before driving off somewhere is always checking the credibility of your brakes. You have to inspect the brake rotors, pads, and be sure that you have enough brake fluid to withstand tough rush hours.The good thing about vehicles today is that drivers can now check the level of their brake fluid or the status of it without even opening the lid. This reservoir is located at the side of the driver just behind the engine bay. The moment you have spotted the reservoir, you have to replace your brake fluid.Once you find out that your fluid is low, don't fret because you can fill it up in no time following some simple instructions.Before opening the cap, remove foreign materials surrounding it. Better yet, wipe it clean.
Use a rag or a piece of cloth that you have never used for anything else. You have to realize that your brake system is sensitive enough that when it catches a foreign material inside it, this would cause your engine some trouble. Better clean than sorry.The moment you take off the cap, slowly pour the brake fluid into the reservoir till it rises to the desired level. Do not let it overflow. Replace the cap and wipe off smudges or spills. Do this process whenever you notice that the brake fluid is becoming low. The checking of the pads and rotors must be done every other day before going someplace. You have to remember not to shake the bottle of fluid before dipping it into your car. Bubbles can cause a few problems. Now that you're done, have a safe trip!

Free Tips on How Jumpstarting Your Car

There are many reasons why people end up with a dead battery in their car. It may be leaving the lights on while they are parked, or it can be any other reason. Getting caught with a dead battery in the mall's parking lot with groceries in hand can be a very frustrating situation to be in. In times like this many people will rely on the kindness of strangers.Before attempting to jumpstart your car, you will need a few things first. You will need a car with the same voltage battery as your car and it should be fully charged, a wire brush, safety glasses, rubber gloves, and a set of jumper cables.If you have all of these things, then you are ready to jumpstart your car.


Well, not quite yet. You first need to stand at the side of the road and flag down a car that you think has the same battery voltage as yours. If you are lucky enough, someone will be willing to assist you and they may have jumper cables with them. You have to remember that there are two types of people who will assist you. One is motorists who have jumper cables with them, and the other has none.This is why it is recommended that you should get your own set of jumper cables. Jumper cables can be quite costly but it will be worth it when you experience getting stuck with a dead battery.Now that you have all the tools you need and the willing motorist, you now have to check your battery first. The battery contains sulfuric acid. If that solution is frozen, never attempt to jumpstart your car. This can result in an exploding battery which can injure you and anyone in the vicinity.You should also check your battery for cracks. If it is, it's shot and should not be jumpstarted.
If you are in this situation, it is better to get a ride and buy a new battery for your car.If your battery has white, green or blue flakes on the terminals, clean them off first with a wire brush. You should wear gloves when you do so as these flakes can be quite nasty if it comes in contact with the skin. The flakes can also be an indication that you need a new battery.If your battery and the willing motorist's battery is of the same voltage, you are now ready to get your car jumpstarted.The first step is to attach one end of the jumper cable to the dead battery's positive terminal. Attach the other end to the starting vehicle battery's positive terminal.
Then, taking the other cable, attach one end to the starting car's negative terminal and attach the other end to the dead car's engine block.For safety, stand back from the hoods of the cars.Then, start the car providing the jumpstart. After about five minutes, start the car with the dead battery. If it doesn't work, stop trying and wait a few more minutes. The car with the dead battery should start by now and if it doesn't, it may be time to call a tow truck.When both cars are started, remove the cable connections. Do it in reverse as when you installed it. This means that you should start by disconnecting the cable from the engine block of the jumpstarted car, then the negative terminal on the car providing the jumpstart, then the end of the cable from the positive terminal of the car providing the jumpstart and lastly the cable from the positive terminal on the car with the dead battery.Jumpstarting the car is just a temporary solution. You should get the battery charged right after you get it started by jumpstarting it.That's it. You are good to go. Don't forget to thank the motorist who helped you out.

Tips on Cleaning Your Car's Battery Posts For Reliable Starting

One of the most important components that makes a car run is the battery. If the battery connection is dirty, your car will come to a complete stop and will be very difficult to start. To know if your car's battery connection is dirty, you will see a flaky white residue on the terminals of your car's battery. You need to get this white residue off as it will interfere with the electricity needed to flow between the car and the battery.


The first step in cleaning the battery is by removing the terminals. Cleaning the batteries with the cables connected will result in not getting it cleaned thoroughly. It's like trying to wash your feet with your shoes on.Depending on how the cables are connected to the battery, you will need one or two wrenches. If the terminals have two nuts, then you will need two wrenches. However, if it has one nut with a big square, you will only need one wrench.When removing the terminals, you should always remember that you should remove the negative cable first. If the terminal requires two wrenches, turn the other one clockwise and the other one counterclockwise.After removing the cables and the connectors, the next step is to clean them up.There are a number of ways to get rid of the corrosion.
Some people will tell you that soda will do the trick. But, unless you have no other choice to clean it up, go for the more modern method where special cleaning fluids can effectively get rid of corrosion.Squirt the solution on the battery posts and terminals, especially the insides. If you have a little brush, use it to clear away the white-colored build up. The terminals and the posts will start foaming and let it do so for a few minutes. Then, rinse it off with a little water.After cleaning both terminals, the next step is to install anti-corrosion discs if you use them. Then, reinstall the terminals. Always remember that you should install the terminals with the positive first and then the negative.As you can see, it is quite easy to clean the battery terminals and posts. All you need is just a few minutes of your time, a battery cleaning solution and you're done. With clean battery terminals and posts, you can be sure of a reliable start.

Free Guides on Performing A Radiator Flush

The car's radiator is responsible for keeping your engine cool and prevents it from overheating. However, as time passes, the radiator can get quite dirty and will need to be cleaned in order to perform efficiently in keeping your engine cool. Cleaning the radiator by performing a radiator flush is inexpensive and will prevent expensive damages to your car's engine. Also, it is something that you can do yourself.Before you perform a radiator flush, you need to make sure that you have everything that you need to perform it. There's nothing more frustrating than draining your radiator only to realize that you need something from the auto parts store that is in another part of town to completely perform the flush.What you will need is a Phillips head screwdriver or a wrench (depending on what the radiator requires), a cloth rag, coolant, radiator flush solution, funnel, and a used coolant receptacle.


Before you perform the radiator flush, you need to make sure that your engine is completely cool. If you just used your car, let it cool for a few hours, or perform the flush the next day.Now that you are ready to perform the radiator flush, the first step is to drain the radiator of the old coolant. Locate the drain plug, which could be anywhere along the bottom of the radiator. It will either be a screw or a bolt plug or even a petcock. Before you loosen it and let the old coolant drain out, be sure that the used coolant receptacle is placed under the drain.After the radiator is completely drained, replace the drain plug and open the radiator cap. Add the contents of the radiator flush solution to the radiator and fill it to the top with water.Replace the radiator cap and make sure it's tight.
After that, start the car and let it run until it gets to its operating temperature or when you see that temp gauge reach the temperature level it normally stays at.Then, turn your heater on and move the temperature control to the hottest position. Let the car and the heater run for about 10 to 15 minutes and turn the car off as well as the heater. Wait until the engine cools off. If the radiator cap is still hot to the touch, it's still hot to open.Once the engine has cooled down, the next step is to drain the radiator again.
Open the drain plug and empty the contents in the radiator. Just remember that nothing from the radiator should leak onto the ground.Now that the radiator is cleaned, the next step is to replace the radiator drain plug or close the petcock. Then, open the radiator cap and refill the radiator with fresh coolant. It is recommended that you fill the radiator with 1:1 mixture of coolant and water. This means that 50 percent should be coolant and the remaining 50 percent should be water. After you fill the radiator, you can fill the plastic coolant reservoir with the same coolant and water mixture.Tighten everything, including the caps and you are ready to go. With a clean radiator, you can be sure that you are keeping your car's engine properly maintained and perform efficiently.

Monday

Great Hydraulic Pressure - Volvo Master Cylinder

Every car needs a provider of great hydraulic pressure in order to maintain the efficiency of the hydraulic system. Not every driver or car owner knows what his master cylinder does for him and his car, when in fact it should be well-known. The master cylinder contributes well to the safety of the driver. Even if the primary and secondary cylinders should have a leak, the master cylinder acts alone to ensure that enough pressure will still be available when the driver steps on the brakes.
Fortunately, there is a company that understands the grave importance that the master cylinder has. Volvo, one of the world's genius in the automotive history, has developed the advanced technology that a high quality master cylinder should be made of. Thus, the Volvo Master Cylinder is of high quality and great performance.

The Volvo Master Cylinder supplies pressure to both circuits of the car. It is a remarkable device that uses two pistons in the same cylinder in a way that makes the cylinder relatively failsafe. Meanwhile, it is the combination valve that warns the driver if there is a problem with the brake system, and also does a few more things to make your car safer to drive. The Volvo Master Cylinder has a brake-fluid source, which is called the brake-fluid reservoir. It also has an electrical connection which is a sensor that triggers a warning light when the brake fluid gets low.
When a driver presses down the brake pedal, it pushes on a primary piston through a linkage. Pressure builds in the cylinder and lines as the brake pedal is depressed further. The pressure between the primary and secondary piston forces the secondary piston to compress the fluid in its circuit. If the brakes are operating properly, the pressure will be the same in both circuits. That is how the Volvo Master Cylinder operates.
Since it is exposed to such an arduous task, it is also vulnerable to wearing out. Although this will happen after a very long time with the Volvo Master Cylinder, one should always ensure that it is replaced or taken care of by a professional. And one must do away with the old, unreliable ones, and trust the name of Volvo. Because with 80 years of service, Volvo knows what is best.

Sunday

Free Tips For Proper Car Maintenance

We all want our cars to last and no one wants to be stranded along side the road with a malfunctioning car or worse yet stalled in the midst of freeway traffic. You can avoid or minimize these calamities by doing the necessary maintenance in accordance with the manufacturer's owner's manual.
Check your oil at least once a month. You should also plan to change oil and buy a new filter every 3000 miles. Be sure to use the recommended oil for your engine. You can find this information in the owner's manual. If however, you purchased a pre-owned car and there is no owner's manual, check with the dealer.

If you live in the Snow Belt you may need to use a different grade of oil in the wintertime. And if you are in an extremely hot climate, you may also need to change the grade of your oil. Again, the owner's manual will specify the proper grades to use.
When you do your monthly oil check, you also need to check the coolant and the transmission fluid.
It is important to maintain these fluids at their proper levels to protect your engine and transmission. And, just as with oil, you need to purchase the type fluid recommended by the manufacturer.
Don't wait until your gas tank is practically empty before refueling. There are sediments at the bottom of your gas tank. If you let the gas levels become low, these sediments will mix in with the gasoline. Then your spark plugs and some engine parts may become clogged. This can entail expensive repairs later on.
Check your battery cables and terminals to ensure you have a good electrical connection. It is also a good idea to always have a set of jumper cables with you. You can usually always find someone to give you a "jump" if you have the cables.
If you have purchased a new car, the owner's manual will advise inspections every so many miles. These are important to keep your warranty in effect.
You should also keep a record of all maintenance performed on your car. This record will help you when you get ready to sell or trade in your car. Prospective buyers are impressed by cars that have been well maintained and this adds to the value of your car.
It is also important to keep your car looking good. Appearance is a major factor when reselling or trading in a car. You need to be careful about parking under trees, particularly if birds are around. Bird droppings can cause paint damage so if a bird does choose your car for a deposit, clean it off immediately.
You need to wash your car often. Many gas stations offer free car washes with a fill-up so this isn't difficult to do. It just takes some extra time.
It is recommended that you wax your car a couple of times a year. This protects the paint from corrosion and also keeps your car looking shiny.
If you notice odd noises or smells, you may have a problem so you need to have a mechanic check the car. Failure to follow up on these can result in breakdowns, accidents and definitely more expensive repairs at a later date. Even if your car appears to be running okay, you should have a professional mechanic check it out once a year.
A little time and money spent on periodic maintenance can help you avoid expensive repairs at a later date.

Car Maintainance Checklist -Wear and Tear Parts

When it comes to used cars, it's often the small problems that are left unchecked which end up costing the most money. Unfortunately, given enough time, they can require repairs that often cost thousands of dollars. Most drivers can avoid expensive car repairs simply by addressing issues as they occur. Below, I'll describe a few common problems and how to resolve them.


The Wrong Gas
Drivers fill their gas tanks with the wrong type of fuel more often than you might think. For example, they'll put diesel gas in when they should be using unleaded (or vice versa). It's an innocent mistake, but it can cause severe damage. If you fill your tank with the wrong gas and recognize the mistake immediately, don't start your engine. Doing so will circulate the gas throughout your car, potentially damaging parts in the process.
Instead, have your car towed to the nearest mechanic. He'll be able to drain the gas tank of the wrong fuel. The drain may cost a few hundred dollars, but it's better than having to pay thousands to repair or replace expensive parts.
Bad Water Pump
Your car's water pump will likely develop a leak at some point. When it does, you should replace it as soon as possible. A lot of drivers fail to do so and as a result, their car's engine ends up overheating. The problem is that an overheated engine can cause the head gasket to blow or rupture. While a blown gasket may sound benign, it usually requires that substantial repair work be performed on the engine.
Replacing the water pump may only cost a few hundred dollars (including the labor). By contrast, replacing the head gasket can carry a price tag of over $2,000. Address the problem early and you'll save money in the long run.
Low Oil
The motor oil that you put in your car lubricates the parts during combustion. If your car runs out of oil, that lubrication deteriorates. When that happens, the parts grind together and heat builds, eventually causing your car to die. At that point, adding oil might not do much good because your engine is likely damaged and may even need to be replaced. Aside from running your car off a steep cliff, allowing the oil levels to decline is one of the most damaging things you can do.
Taking care of your car is largely a matter of identifying and addressing small problems early. If you do, those small problems won't lead to expensive car repairs in the future. And these days, when the economy is soft, avoiding unnecessary repairs is like money in the bank.

Everette Jamison

Thursday

Free Tips on How to Taking Care of Mercedes-Benz Brake System

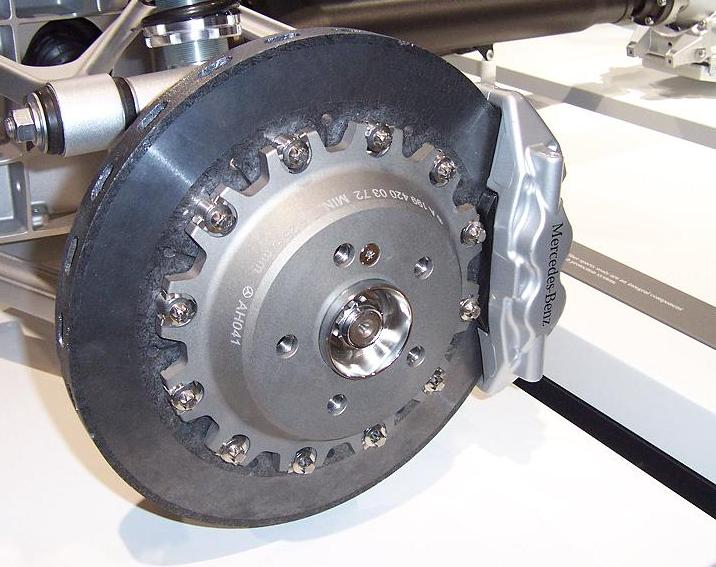
The Mercedes master cylinder that is usually used for Mercedes vehicles are manufactured by Girling, ATE, and Bendix. These master cylinders utilized two or three-chamber reservoirs, a level sensor contact built into each chamber. In times when brake fluid level is low or when there is pressure differential between two brake circuits caused by loss of fluid in either circuit, a warning light is activated.

The series 190, 420, and 500 make use of floating type front disc brake calipers while the other Benz models especially those with parking brakes and are cable actuated in rear brake rotor calipers utilizes non-floating type. All Mercedes cars have brake pad wear indicators and differential pressure warning indicator. The 420 and 500 series have inner pads only while the Anti-Lock Brake System is offered as a standard feature on the 420SEL, 300 and 560 series and optional for the 190 series. For the diesel models a vacuum pump is incorporated to provide vacuum to the power brake unit. Adjusting Pedal Height The height of the pedal measured from pedal pad to pedal stop should be 150mm.

To get the correct pedal height adjust the loosen lock nuts and turn stop light switch afterwards tighten lock nuts and pedal free play 5-15 mm. Above the brake pedal is the stoplight switch, loosen lock nuts and adjust switch in such a way that the contact button extends 6-8mm and then afterwards tighten lock nuts.

Parking Brake

1. Before raising the vehicle it is best to remove only one lug bolt at each rear wheel.

2. Try to rotate wheel until lug bolt hole is positioned over parking brake adjuster at an angle of 45 degrees forward for diagonal swing axle and 90 degrees forward for diagonal swing axle with starting torque compensation. And remember that parking brake must be adjusted if the brake pedal can be depressed by more than 2 steps of 6 without any braking effect. Try not to try to alter screw on parking brake intermediate lever since these screws are for balancing cable lengths only.

3. using a screwdriver inserted through the lug bolt hole, hand turn the adjuster until rear wheel can no longer be turned, back off the adjuster until it can be turned without the dragging the wheel.

Checking the Brake Warning Light

1. On the dash is mounted a dual warning light, try to turn the ignition on. Normally you will see a light glowing once parking brake lever is pulled tone notch and goes off when brake lever is full released.

2. To test the circuit warning sensor, again turn on the ignition, release the parking brake and make sure that the light is off. Open the bleeder screw on one wheel and depress brake pedal and the light should light up.

3. Close the bleeder screw, refill the brake fluid and bleed system. Make sure also that light goes out after testing and if the light didn’t turn off then the differential pressure pin of the Mercedes brake master cylinder should be reset.

Wednesday

Free Tips on Preparing Your Automobile For Long Term Storage.

If you are leaving town for an extended period of time or are storing a vehicle for seasonal use, there are several things you can do to protect your automobile and insure it will be ready for use when you retrieve it. Taking the time to prepare your car right will save you a lot of grief and money later on.
The first step is to find a suitable location for long term storage. This is critical. The location should be secure, dry and clean. Putting it in a dusty barn is probably one of the worst places for you car. Make sure the storage place is dry and free of moisture. Moisture, humidity and condensation are the biggest hazards to exterior, interior and engine. Rust and corrosion can form on exposed metal and mold and mildew can grow in the interior as well. The best place is a climate controlled storage facility. Just look under storage in the yellow pages and there should be some options for you.
Also, you will need to rodent proof your storage as well. Rats can destroy the wiring system. They can also get into the interior and build nests there. One option is to place rat poison or some other pest control device around the car. Ma If the storage unit has power to it, I would recommend getting a noise box that repels rats and mice. You can buy them at your local hardware store. These are very safe and will not hurt pets or children.
Once you have picked a suitable location, it is time to prepare your car.
Step one is to change the oil and replace it with a synthetic. Changing the oil before storage will reduce moisture in the system and help prevent corrosion in the engine. The reason for synthetic oil is because of the coating properties and it will not break down as quickly as conventional oil.
Now you will need to fill the gas tank completely full. Most people siphon out the gas and leave the tank empty. This is not correct and the moisture left in the empty tank will encourage rust. Fill the tank as high as you can and leave it. This will prevent moisture from forming and prevent rust accumulation. It is also prudent to add in a gas stabilizer as well.
The next step is the battery. If the vehicle is in for short term storage, you may want to hook up battery charger to the battery. This will insure all electrical equipment like stereo will have power and any saved settings will be there when you return. For longer periods of time, remove the battery. Batteries can crack and leak acid everywhere. In this case it is best to just remove it and replace it when you return.
The next area to prepare is the external weather stripping and tires. The best product to use for this is a lithium grease. Stay away from petroleum based products. They will eventually dry out and crack the rubber. To apply the grease, spray it on a rag first and then wipe it on the tires and weather stripping. Be sure to cover the gaskets in the doors
, sunroof and trunk.
For the interior, use a leather or vinyl conditioner. This will safeguard these surfaces from cracking and drying.
The last step is to thoroughly clean the exterior. After you have washed it, apply a coat of wax and buff it out. If you have an air buffer, this process will be a lot easier and will be more effective. Then cover the car with a good quality car cover. If you follow these basic steps, your expensive automobile should be in the same shape you left it before your journey.

Free Tips on The Mysterious "Check Engine" Light.

If you have had your car or SUV long enough, that annoying “check engine” light has probably made an appearance on your dash board. The first time I saw it, I popped the hood and “checked” the engine. It seemed ok to me. My car was running fine. So like most experienced car drivers, I ignored it or I tried too. The really insidious thing about that little innocent light is that it really gets to you after a while. After a long drive at night with that light shining at me like a laser beam, I considered putting it out its misery with my tire iron. Which brings up the question, what is it there for.

Well here is a basic answer. The “check engine” light is connected to the car's engine fuel management computer. This is the computer that runs the fuel injectors, reads the engine sensors, etc. The oxygen sensors are used by the ECM to determine how accurately it's injecting the fuel, and adjusting the way the fuel is injected to compensate for changing conditions. When the computer inside the ECM detects that there is something wrong, the ECM turns on the “check engine” light. For example, a bad sensor or engine operating parameter that exceeds a preprogrammed set point then the ECM turns on the light to let you, the driver, know that something is wrong and needs to be corrected. It doesn’t mean something cataclysmic is about to happen, just that the computer that runs a lot of the functions in your car is getting some bad information. Most of the time this means an oxygen sensor has failed and needs to be replaced. In a lot of states, your car will not pass the inspection when the light is on. So you have to fix it before you can get a new inspection sticker.

Free Tips on Torque Converter Operation

The torque converter is one of the least understood components in an automatic transmission equipped vehicle. I will attempt to explain what it does and how it does it.
The torque converter has a few different functions.
We first need to understand that there is no direct link between the crankshaft and the transmission input shaft (except in the case of a lock up style converter, but we'll talk about that later). This means that the first function of the converter is to connect the crankshaft and the input shaft so the engine can move the vehicle; this is accomplished through the utilization of a fluidic coupling effect.
The torque converter also replaces the clutch that is required in a manual transmission; this is how an automatic transmission vehicle can come to a stop while still being in gear without stalling the engine.


The torque converter also acts as a torque multiplier, or extra gear ratio, to help the car get moving from a stop. In modern day converters this theoretical ratio is anywhere between 2:1 and 3:1.
Torque converters consist of 4 major components that we need to concern ourselves with for the purpose of explanation.
The first component, which is the driving member, is called the impeller or "pump". It is connected directly to the inside of the converter housing and because the converter is bolted to the flexplate, it is turning anytime that the engine rotates.
The next component, which is the output or driven member, is called the turbine. The transmission's input shaft is splined to it. The turbine is not physically connected to the to the converter housing and can rotate completely independently of it.
The third component is the stator assembly; its function is to redirect the flow of fluid between the impeller and the turbine, which gives the torque multiplication effect from a standstill.
The final component is the lock up clutch. At highway speeds this clutch can be applied and will provide a direct mechanical link between the crankshaft and input shaft, which will result in 100% efficiency between the engine and transmission. The application of this clutch is usually controlled by the vehicle's computer activating a solenoid in the transmission.
Here's how it all works. For the sake of simplicity, I will use the common analogy of two fans which represent the impeller and the turbine. Let's say that we have two fans facing each other and we turn only one of them on- the other fan will soon begin to move.